Customize the lead qualification experience
As an admin, you can customize the lead qualification experience to help sellers qualify leads more effectively.
License and role requirements
| Requirement type | You must have |
|---|---|
| License | Dynamics 365 Sales Premium, Dynamics 365 Sales Enterprise, or Dynamics 365 Sales Professional More information: Dynamics 365 Sales pricing |
| Security roles | System Administrator More information: Predefined security roles for Sales |
Difference between new lead qualification experience and legacy experience
Important
The new lead qualification experience is an early access feature. You can opt in to use it for testing and adoption in your environments.
The new lead qualification experience lets you customize the following aspects:
- Select who creates opportunities when leads are qualified—seller or automatically by the system.
- Allow sellers to create multiple opportunities when a lead is qualified.
- Modify the opportunity form that opens when a lead is qualified.
- Choose to let Copilot summarize the lead after a lead is qualified.
The legacy experience only lets you choose whether to automatically create account, contact, and opportunity records when a lead is qualified.
How to customize the lead qualification experience
In the Sales Hub app, select the Change area icon
 at the bottom of the site map, and then select App Settings.
Under General Settings, select Lead + Opportunity management > Lead Qualification.
You'll see following options:
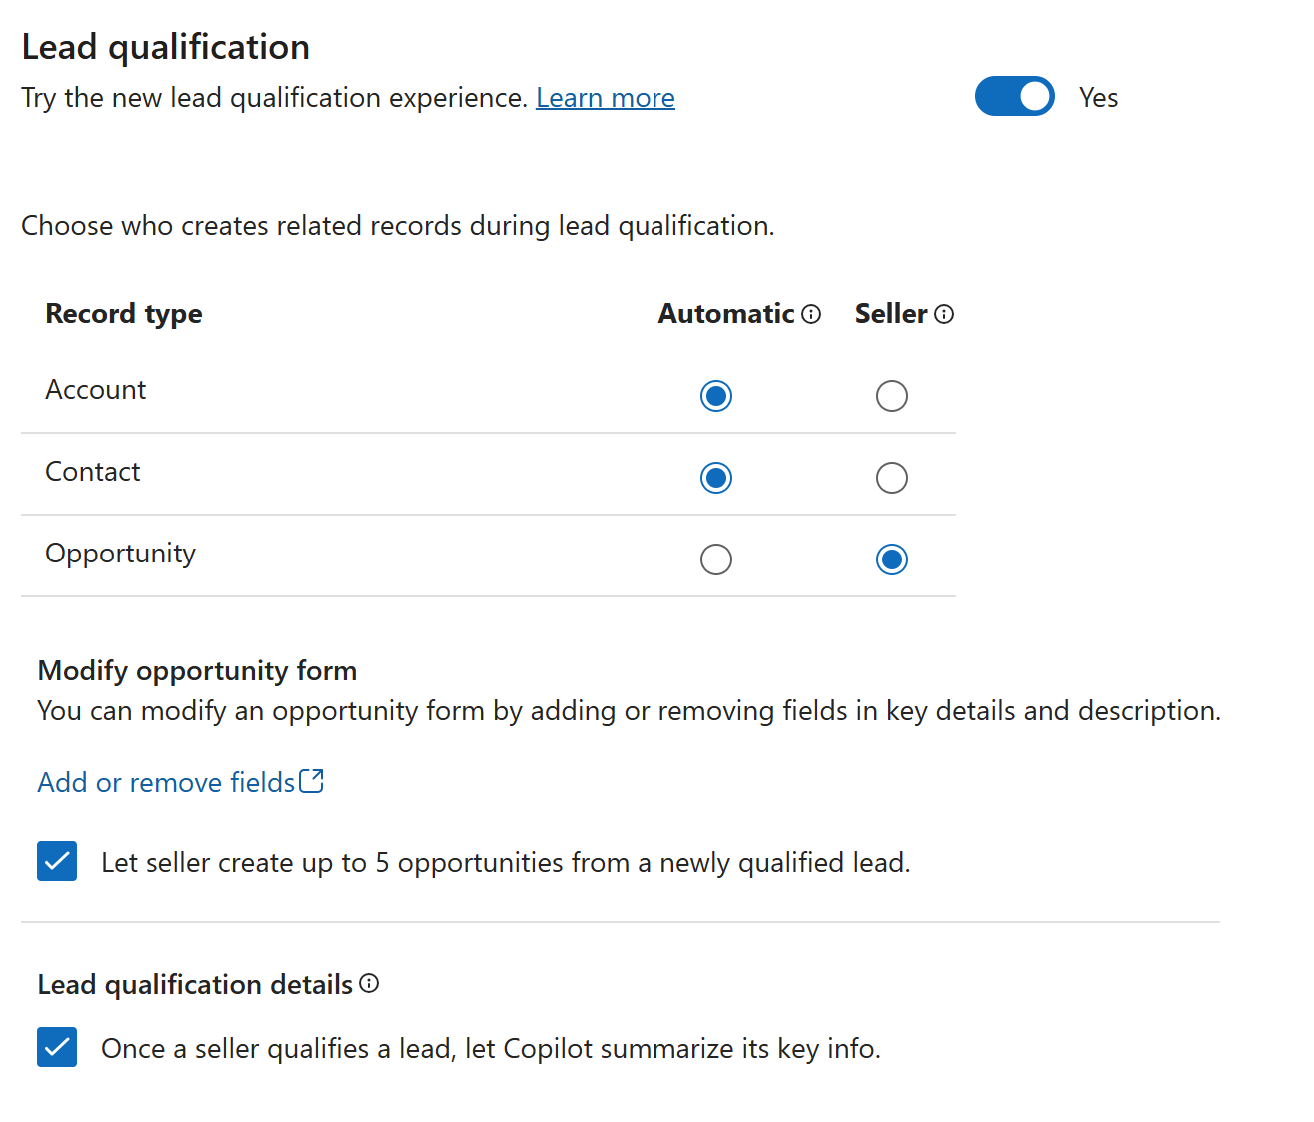
Try the new lead qualification experience: Turn this setting on to use the new lead qualification experience. This setting lets you define the following experiences:
- Define the record creation experience for each record type
- Customize opportunity creation experience for qualified leads
- Enable lead summarization
Turn it off to select the Auto-create records for newly qualified leads setting.
Auto-create records for newly qualified leads: This is the legacy experience. Turn on this setting to automatically create account, contact, and opportunity records when a lead is qualified.
If you turn off both settings, sellers are prompted to choose the records they want to create for the lead.
For information about the fields that are mapped from the lead to other entities when records are created automatically, see Field mappings to other entities.
Define the record creation experience for each record type
When you turn on the new Lead qualification experience, you can define who creates the record—seller or automatic—when a lead is qualified.
Select Seller if you want sellers to decide whether to create a record, use an existing record, or not create a record at all.
Select Automatic if you want the system to create the record automatically. Sellers can review the records that will be created automatically.
In either case, if there's a matching record in the system, the duplicate detection rules are applied to prevent the creation of duplicate records. Sellers can choose to use the existing record or create a new one. For more information about rules used to identify duplicates, see Manage duplicate leads.
Customize opportunity creation experience for qualified leads
The following options are available only when you select Seller for Opportunity creation in the new Lead qualification experience:
Under Modify opportunity form, select Add or remove fields to customize the opportunity form that opens when a lead is qualified. The Quick create form opens in Power Apps for editing. You can add or remove fields, change the order of fields, or change the properties of fields. For more information, see Add, move, configure, or delete columns on a form.
Select Let seller create up to 5 opportunities from a newly qualified lead to allow sellers to create multiple opportunities when a lead is qualified. This option is useful when a lead is associated with multiple deals. Sellers can create up to five opportunities from a lead.
Summarize the lead after it's qualified
When you turn on the new Lead qualification experience, you can choose to let Copilot summarize the lead after it's qualified. Select the checkbox under the Lead qualification details section.
Note
Copilot must be enabled for your organization to use this feature.
When this option is selected, Copilot summarizes the lead by extracting key information from the lead and creating a summary card. The summary card includes key information such as the lead's name, company name, email, phone number, and address, along with links to the account, contact, and opportunity records that were created.
Define the experience using legacy web client
If you aren't using the Sales Hub app, you can define the lead qualification experience by using the legacy web client. However, you can only configure the legacy experience using the web client. The new lead qualification experience is available only in the Sales Hub app.
In your app, select the Settings icon, and then select Advanced Settings.
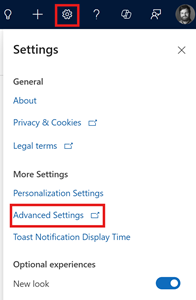
The Business Management page opens.
Select Settings > Administration > System Settings.
Select the Sales tab.
Under Qualify lead experience, set Create Account, Contact, and Opportunity records by default upon qualifying a lead to Yes to automatically create account, contact, and opportunity records when a lead is qualified. Set it to No to allow salespeople to choose which records to create when a lead is qualified.
Field mappings to other entities
When a lead is qualified, values of some fields from leads are automatically mapped to the corresponding fields in accounts, contacts, and opportunities. To know why you can't delete out-of-the-box field mappings and apply custom field mappings for lead qualification, see this FAQ.
Fields mapped to opportunity
| Field name in lead | Logical name in lead | Field name in opportunity | Logical name in opportunity |
|---|---|---|---|
| Topic | subject | Topic | name |
| Contact | parentcontactid | Contact | parentcontactid |
| Account | parentaccountid | Account | parentaccountid |
Fields mapped to account
| Field name in lead | Logical name in lead | Field name in account | Logical name in account |
|---|---|---|---|
| Company | companyname | Account name | name |
| Website | websiteurl | Website | websiteurl |
| Business Phone | telephone1 | Phone | address1_telephone1 |
| Street 1 | address1_line1 | Address 1: Street 1 | address1_line1 |
| Street 2 | address1_line2 | Address 1: Street 2 | address1_line2 |
| Street 3 | address1_line3 | Address 1: Street 3 | address1_line3 |
| City | address1_city | Address 1: City | address1_city |
| State/Province | address1_stateorprovince | Address 1: State/Province | address1_stateorprovince |
| Zip/Postal Code | address1_postalcode | Address 1: ZIP/Postal Code | address1_postalcode |
| Country/Region | address1_country | Address 1: Country/Region | address1_country |
Fields mapped to contact
| Field name in lead | Logical name in lead | Field name in contact | Logical name in contact |
|---|---|---|---|
| First name | firstname | First name | firstname |
| Last name | lastname | Last name | lastname |
| Job title | jobtitle | Job title | jobtitle |
| Business Phone | telephone1 | Phone | managerphone |
| Mobile phone | mobilephone | Mobile phone | mobilephone |
| emailaddress1 | emailaddress1 | ||
| Street 1 | address1_line1 | Address 1: Street 1 | address1_line1 |
| Street 2 | address1_line2 | Address 1: Street 2 | address1_line2 |
| Street 3 | address1_line3 | Address 1: Street 3 | address1_line3 |
| City | address1_city | Address 1: City | address1_city |
| State/Province | address1_stateorprovince | Address 1: State/Province | address1_stateorprovince |
| ZIP/Postal Code | address1_postalcode | Address 1: ZIP/Postal Code | address1_postalcode |
| Country/Region | address1_country | Address 1: Country/Region | address1_country |
Can't find the options in your app?
There are three possibilities:
- You don't have the necessary license or role. Check the License and role requirements section at the top of this page.
- Your administrator hasn't turned on the feature.
- Your organization is using a custom app. Check with your administrator for exact steps. The steps described in this article are specific to the out-of-the-box Sales Hub and Sales Professional apps.
Related information
Qualify or convert leads
Create or edit leads
FAQ about lead qualification experience
Troubleshoot issues with lead qualification